Wednesday, 27 February 2019

All wrapped up


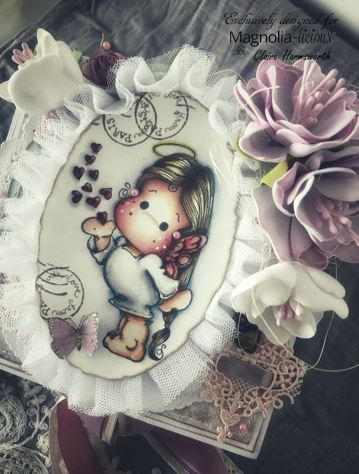
Back with you today with a wrapped up envelope I have created and filled up with foamiran flowers.


This stamp is from Stampclub 2 which will soon be available at our Magnolia-Licious store.


If you want to know how I have created this project, just leave a comment underneath and I will forward you the dimensions.


This Tilda from Stampclub 2 comes with several options. The actual present  she is holding is a separate stamp from the same collection but if you want you can use any of the other stamps like the ice-cream for example.


I have coloured her up with Prisma Pencils on Grey Strathmore paper. Then fussy cut her and the present and used foam on the present only.


I hate fussy cutting but since I wanted to use her on a different background it had to be done :)


I have used Lemoncraft designer paper which is another paper collection that I adore.


The flowers are all foamiran from our shop. Even the stamens. This time I used the pearl ones as well.


The leaf dies come from different Magnolia doohickey kits and Online Magnolia Day Kits


I used some flower chipboards and a heart balloon chipboard to give it a bit of dimension.


I have used two different coloured pearl drops around the project. Lavender/pink and pearl white.


The sentiment stamp is also Magnolia. It's from Raising The Ceiling Collection in 2010.


The pink needles are something I have a box of - not sure when it will ever finish :)


Just noticing I haven't used any ribbon this time on my project. Not to worry we will double up next time round haha


Have a great day everyone!


XOXO
Claire


Friday, 22 February 2019

Lavender and Lace - My first DT Inspiration for Magnolia-Licious


Hello everyone, hope you are looking forward to the weekend and to some quiet crafty time :)

I am so pleased to have joined the Magnolia-licious team with all the lovely ladies plus Shawn who is indeed a truly kind person whom I have the pleasure to now also call a friend.

I am sharing with you today what I have prepared as my first inspiration post for Magnolia-licious.

Get ready for loads of pics .... hope you don't get bored :) !


This box took me quite a bit of time to complete as it involved a lot of mental calculations  and stitching, but I have to say I loved doing it, especially since it was something I had in my mind which needed to be created.

This is Miss You Tilda from the 2016 - A Touch of Love collection.  I have colored her up with Distress Inks and die cut it with a personal die from my collection. It gave her a shabby cut not a proper oval. I have used some organza around the image to give it a bit of a different look.


The foamiran flowers you can see on this project are flowers that I have made myself. If you have a look here you will find several different dies you can use to create some beautiful flowers with the colour and shape of your choice. The shop stocks a lot of different coloured foamiran.  I enjoyed experimenting and forming them particularly for this box.


The papers are of course Maja Design - Vintage Summer Basics - the right colour I needed.


I have formed a small frame around the bottom of the lower flap to form a box.


I have use a Magnolia stamp for the inside of the box which is Elegant Heart from the Raise the Ceiling Collection in 2010.  I have embossed it with mirror gold embossing powder.


The beautiful chipboard heart is from Scrapiniec. You can find several heart shapes in the shop which you can use for your projects. Heart Chipboard is something we can use on any project.


I have used Light Grey Foamiran from the shop which I have dyed with some milled lavender distress. 

Stamens also purchased from the shop, have given the flowers the pearly centre look they needed.


Here you can see better how it looks from the side. I love how the fluffy organza looks around the image :)


I have stamped a Magnolia sentiment on the side of the box and also used a Magnolia butterfly around the edges.


The ribbon is actually two ribbons - a wider one and seam binding glued on top of each other.


I have placed a nice scented bath fizz that fits exactly inside the box in the form of a heart...an ideal present for a kind friend :)

Hope to have inspired some of you to create this box and if you need any info happy to help anytime.

XOXO

Claire

Tuesday, 12 February 2019

New Papers


I was so happy to receive my large box of papers that I ordered from Moda Scrap today! :)


I had to use them ASAP so after work I headed off to sadly cut through them and use them on my new Tilda from the Stampclub 2.


I coloured her up with Albrech Durer Faber Castell pencils on kraft paper. Sentiment is also from Stampclub 2.


This set of paper is called Let Your Soul Bloom and it's full of lovely patterned flowery paper in bright green and shades of pink/reds along with lovely designs.


All I had to do was literally use them as they were. In fact this Tilda Tag has been cut directly on the paper without doing anything else.


I have used a cut out from the same papers to use inside this white frame.  Rose ribbon is from stash I have piled at home. I need to sort through my ribbons as they are coming out of everywhere haha!


The small flower are from Wild Orchid Crafts and the glass weave is from Magnolia.


Seam binding is from https://magnoliastamps.us


Hope you fell in love with these papers too :)


Wishing you loads of inspiration ....

Claire x

Tuesday, 5 February 2019

Magnolia-licious February Challenge and Winner

I have some fantastic news to share :)  I have been chosen to form part of the Magnolia-licious DT Team yippee!!!


If you have never visited the blog now is the time to go and participate with your cards/projects. This month's theme is 'use your favourite paper' and what's not to love in the fantastic paper pads from Maja Design available here.


You also enter for a chance to win 20 USD plus the chance to be a guest designer...whoop whoop!


So here is the link to the February Challenge and here is my inspiration project for this month.


I have made a lollipop shaker card with the sweet
 Cupid Angel Tilda which is currently on sale here


I have coloured her with Copics and used die cut hearts and beads on the inside.
 I have embossed the acetate on the front as well.


Can you spot the Laserowelove chipboard frame behind Tilda?
You can find several to choose from at the shop here


and this is how it looks from the back.


Looking forward to see what you create with your favourite paper this month and don't forget that the shop offers free postage if you spend more than 75 USD.


Love
Claire

Tuesday, 29 January 2019

A mixed media card with no colouring


Hi again everyone hope you had a good start to your week.

I have been admiring a lot of mixed media projects on line lately and was keen on trying something out.

This time no colouring was done just stamping and distressing and sticking on lots of things :)


This birthday card is for a colleague of mine. I used a Stempelglede stamp in the centre which I die cut with a Magnolia die.

On it I stuck one of the lovely Laserowelove floral frames.


The Happy Birthday stamp is a Magnolia rubber stamp which I use frequently.

Some shabby chic lace was added on at the lowest part of the card.


This metal cabochon is something I purchased ages ago and use from time to time. The letter A is part of an alphabet die - A is for Alexandra. I used some stickles to make it pop


The cut out butterfly and pinkish rose are from a Mintay paper collection which is adorable.


Flowers, stickles and some metal embellishments were added on as well to match with the cabochon on the side.

Anyhow I love how it turned out and hopefully Alexandra would love it too :)

Love

Claire xoxo


Friday, 25 January 2019

Copic colouring tutorial on Magnolia Channel - Cupid Angel Tilda


Hi everyone good morning. A quick one today just to share with you my latest copic colouring tutorial video on the Magnolia Channel.


I have coloured this sweet Cupid Angel Tilda for you.


You can follow the step by step here

Enjoy and if you have any questions feel free to ask away

Lots of love

Claire xoxo

Thursday, 24 January 2019

Shabby Chic


Hi everyone good morning and I hope you are all having a great day!

 Back with you today with my next Magnolia DT project with a front frame card which I had been longing to do since last year.

This is a two fold card with a front frame to give the front of the card a little bit more dimension.

I have used several Magnolia dies as well. Used the swedish lace border on the front of the frame - it's a die which I use quite often.


I have coloured the sweet Magnolia Tilda bringing flowers with distress ink and have inked the edges with distress ink frayed burlap. I have used various post stamps to give it a more shabby style.
 

 As you can see from the side the front pops out which makes it quite easy to add on more decorative items. I have used Maja Paper - Vintage Summer Basics for my card today and I have cut out a small postcard and inserted it at the back.


Can you spot the glossy accents on the flowers that Tilda is holding?
Some jute ribbon and a birdhouse charm on the side plus flowers from Wild Orchid Crafts.


The sentiment is also a Magnolia. I have opted to stitch my card base this time.


Did you spot the lovely Magnolia luggage die. I just had to include it in my project. It is quite easy to assemble and it gives your projects/cards a lot of dimension and cuteness I suppose.


Today am also showing you how I decorated the inside of the card. Very basic but used a Stempelglede stamp from Postcard from Paris.


I hope you have enjoyed seeing how I completed my card today and I look forward to sharing with you the next one.

and here are the links to what I have used today:


Take care everyone and stay warm x

Claire xoxo